自动化测试 RobotFramework-ride使用相关总结
开发环境
win11 家庭中文版
Python 3.9.13
robotframework6.1.1
说明:为了方便的使用robot命令,安装好robotframwork后,修改系统环境,添加robot.exe(PYTHON_HOME/Scripts/robot.exe)所在路径到系统环境变量path
安装参考连接:https://github.com/robotframework/robotframework/blob/master/INSTALL.rst
说明:实践过程中有安装过更robotframework7.0.1,发现导入自定义库候,RIDE运行用例套件时会报类似如下错误:
[ ERROR ] Calling method 'log_message' of listener 'D:\Program Files (x86)\Python39\lib\site-packages\robotide\contrib\testrunner\TestRunnerAgent.py' failed: AttributeError: 'Output' object has no attribute '_xmllogger'
docutils-0.21.2-py3-none-any.whl
pip install docutils==0.21.2
robotframework-ride 2.0.8.1
依赖包:
numpy               2.0.0
pillow              10.3.0
Pygments            2.18.0
Pypubsub            4.0.3
pywin32             306
six                 1.16.0
wxPython            4.2.1
使用总结
安装ride
pip install robotframework-ride
运行ride
首次运行,可以通过执行以下命令开启RIDE GUI
cd %PYTHON_HOME%\Scripts
python ride.py
开启后,菜单 Tools -> Create RIDE Desktop Shortcut 创建桌面快捷方式,下次运行即可通过双击中快捷方式启动RIDE。
添加自定义类库
新建测试用例集
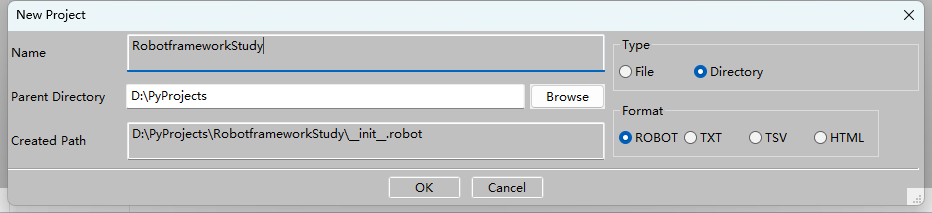
菜单File -> New Project,创建项目
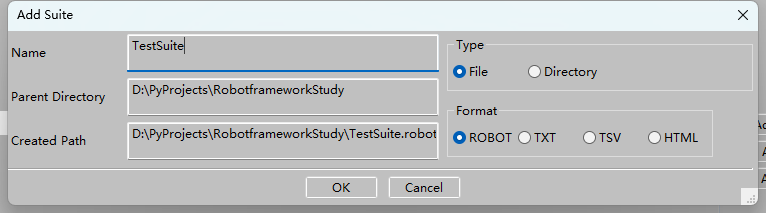
右键上述创建的项目 -> New Suite 创建测试套件
右键上述创建的套件 -> New Test Case 创建测试用例

添加自定义类库
实践用到的Python项目工程根目录路径:D:\PyProjects\CustomLibrary
基于模块
项目工程代码组织结构如下:
CustomLibrary
    MyTestLib.py
    __init__.py
CustomLibrary/MyTestLib.py代码内容如下:
# -*- coding:utf-8 -*-

def example_keyword():
    print('example_keyword')

def key_word_func():
    print('key word function')
点击项目->Library -> Browse,选择模块脚本所在路径

说明:也可以不点击Browse按钮,直接在上图的Name输入框直接输入目标类库名称、路径
注意:实践时发现,类库导入要在测试用例套件节点上设置,否则不起作用。类似的,资源导入也是如此
最终有效测试套件文本化编辑结果(TestSuite.robot文件内容)如下:
*** Settings ***
Library           ../CustomLibrary/MyTestLib.py

*** Test Cases ***
测试用例1
    example keyword
    key word func
问题:上图的Name输入框能不能简化为直接输入一个类库名称呢?
最终要实现的文本编辑效果如下:
*** Settings ***
Library           MyTestLib
答案是:可以的。
具体实现方法有3种:
- 方法1:编辑
%PYTHON_HOME%\Lib\site-packages\pywin32.pth,在文件末尾添加类库模块所在目录路径(例中为D:\PyProjects\CustomLibrary),保存即可(不需要重启RIDE)。注意,pywin32这个文件中不能有中文,否则会导致python无法正常运行 - 方法2:编辑系统环境变量,新建
PYTHONPATH环境变量,设置变量值为类库模块所在目录路径,保存即可(需要重启RIDE)。 - 方法3:
RIDE -> Tools -> Preferences -> Importing, 设置Pythonpath输入框的值为类库模块所在目录路径(不需要重启RIDE)
基于类
项目工程代码组织结构如下:
CustomLibrary
    MyTestLib.py
    __init__.py
CustomLibrary/MyTestLib.py代码内容如下:
# -*- coding:utf-8 -*-

class MyLib():
    def example_keyword(self):
        print('example_keyword')

    def key_word_func(self):
        print('key word function')
最终有效测试套件文本化编辑结果(TestSuite.robot文件内容)如下:
*** Settings ***
Library           MyTestLib.MyLib

*** Test Cases ***
测试用例1
    example keyword
    key word func
注意:
- 本例已将
MyTestLib.py所在目录路径添加到pywin32.pth - 当类和模块名称不一致时,必须通过
module_name.class_name的方式指定类库
修改CustomLibrary/MyTestLib.py代码内容如下:
# -*- coding:utf-8 -*-

class MyTestLib():
    ROBOT_LIBRARY_SCOPE = 'GLOBAL' # 设置类库作用域为全局--在整个测试执行过程中只创建一个实例,它由所有测试用例和测试套件共享
    def example_keyword(self):
        print('example_keyword')

    def key_word_func(self):
        print('key word function')
最终有效测试套件文本化编辑结果(TestSuite.robot文件内容)如下:
*** Settings ***
Library           MyTestLib

*** Test Cases ***
测试用例1
    example keyword
    key word func
说明:当类和模块名称一致时,可以省略类名
通过类继承实现由多个类组成的类库
实现方式1
项目工程代码组织结构如下:
CustomLibrary
│  MyTestLib.py
│  __init__.py
│
├─host
│      host_operations.py
│      __init__.py
│
├─monitor
│      monitor_operations.py
│      __init__.py
│
└─printer
        printer_operations.py
        __init__.py
CustomLibrary/host/host_operations.py代码内容如下:
# -*- coding:utf-8 -*-


class HostTestHelper():
    cpu_type = 'x86'
    def __init__(self):
        pass

    @classmethod
    def set_cpu_type(cls, cpu_type):
        print(f'set cpu type {cpu_type}')
        cls.cpu_type = cpu_type
CustomLibrary/monitor/monitor_operations.py代码内容如下:
# -*- coding:utf-8 -*-

class MonitorTestHelper():

    def __init__(self):
        pass

    def get_monitor_resolution_ratio(self):
        print('get monitor ratio')
        return '1600 x 900'
CustomLibrary/printer/printer_operations.py代码内容如下:
# -*- coding:utf-8 -*-

from host.host_operations import HostTestHelper
class PrinterTestHelper():

    def __init__(self):
        self.driver_type = ''

    def set_printer_driver(self):
        if HostTestHelper.cpu_type == 'x86':
            self.driver_type = 'SANXIN'
        elif HostTestHelper.cpu_type == 'x64':
            self.driver_type = 'HP'

        print(f'set printer driver {self.driver_type}')

    def get_printer_driver(self):
        print(f'get printer driver')
CustomLibrary/__init__.py代码内容如下:
# -*- coding:utf-8 -*-


# 注意,使用RIDE运行测试套件时,这里导入时必须包含项目根目录包,否则会导致类库失败,
# from host.host_operations import HostTestHelper  # 会报错,提示类似错误:ModuleNotFoundError: No module named 'host'
from CustomLibrary.host.host_operations import HostTestHelper
from CustomLibrary.monitor.monitor_operations import MonitorTestHelper
from CustomLibrary.printer.printer_operations import PrinterTestHelper

class CustomLibrary(HostTestHelper, MonitorTestHelper, PrinterTestHelper):
    ROBOT_LIBRARY_SCOPE = 'GLOBAL'
    def __init__(self):
        super().__init__()
pywin32.pth修改成如下配置
# .....
D:\PyProjects\CustomLibrary
D:\PyProjects
注意:文件如果去掉D:\PyProjects\CustomLibrary这行内容,会导致上面例中的MyTestLib类库导入失败,如果去掉 D:\PyProjects 这行内容则会导致CustomLibrary类库导入失败。
最终测试套件文本化编辑结果如下
*** Settings ***
Library           MyTestLib
Library           CustomLibrary

*** Test Cases ***
测试用例1
    example keyword
    key word func
    set_cpu_type    x64
    set_printer_driver
    get_printer_driver
    get monitor resolution ratio
实现方式2
在场景1的基础上,做以下修改,其它不变
1、删除 CustomLibrary/__init__.py代码,即还原__init__.py为新建状态
2、修改CustomLibrary/MyTestLib.py,修改后的代码内容如下:
# -*- coding:utf-8 -*-


# from CustomLibrary.host.host_operations import HostTestHelper # 这样也可以
from host.host_operations import HostTestHelper
from monitor.monitor_operations import MonitorTestHelper
from printer.printer_operations import PrinterTestHelper

class MyTestLib(HostTestHelper, MonitorTestHelper, PrinterTestHelper):
    ROBOT_LIBRARY_SCOPE = 'GLOBAL'
    def __init__(self):
        super().__init__()
最终有效测试套件文本化编辑结果(TestSuite.robot文件内容)如下:
*** Settings ***
Library           MyTestLib
Library           CustomLibrary

*** Test Cases ***
测试用例1
    set_cpu_type    x64
    set_printer_driver
    get_printer_driver
    get monitor resolution ratio