OpenCV实战案例——校正+切边[C++]
0.前言
本文以实战案例为背景,讲述如何使用计算机图形学知识完成需求,实现最终效果。本文包含实战案例素材以及过程代码讲解,方便读者理解。
1.案例需求
某公司打算开发一款用于提取学生作业本的程序,学生用手机拍摄自己的作业上传到程序,程序进行处理最终提取出作业本区域方便老师批改。
下图(图1-1)为某学生提交的作业本俯拍图片。

该公司希望该程序将图片裁剪校正使其达到方便教师批改的大小。最终效果图如下(图1-2)所示。

2.处理思想
- 由于环境因素,学生上传的图片可能存在较多的噪点,不利于计算机处理,故可以采取高斯模糊进行降噪处理,方便后续提取特征。
- 为了更方便提取图像特征,应将图像灰度化、二值化,使其尽可能显示出图片边缘纹理特征,对于处理期间的噪声点可以采用形态学操作消除。
- 通过需求结果的特点,可以使用轮廓查找findContours()函数查找二值图中的轮廓,根据大小、型状等外显特征进行过滤。
- 考虑到学生上传的图片可能存在倾斜情况,而普通的矩形查找(boundingRect函数)难以胜任该工作,所以应选择能够衡量角度特征的矩形查找函数,故本文选取minAreaRect()函数查找最小外接矩形。
- 获取矩形大小、角度等特征后,可以通过仿射变换校正图片,ROI(感兴趣区域)提取获取最终结果。
3.代码实现
点击查看代码
//读取图像
Mat mSrc = imread(path1, ImreadModes::IMREAD_COLOR);
imshow("源图像", mSrc);

点击查看代码
//高斯模糊
Mat mGaussian;
GaussianBlur(mSrc, mGaussian, Size(3, 3), 1);

//转灰度
Mat mGray;
cvtColor(mGaussian, mGray, ColorConversionCodes::COLOR_BGR2GRAY);

//二值化
Mat mBin;
threshold(mGray, mBin, 244, 255, ThresholdTypes::THRESH_TOZERO);

//膨胀
Mat mDilateKernal = getStructuringElement(MorphShapes::MORPH_RECT, Size(3, 3));
dilate(mBin, mBin, mDilateKernal, Point(-1, -1));
imshow("二值图", mBin);

通过图3-2可以明显看到学生的作业本轮廓,但由于背景干扰,仍出现大量的噪点无法去除。
点击查看代码
//查找轮廓
vector<vector<Point>> vvContours;
vector<Vec4i> vHierarchy;
findContours(mBin, vvContours, vHierarchy, RetrievalModes::RETR_EXTERNAL, ContourApproximationModes::CHAIN_APPROX_SIMPLE);

//绘制轮廓
RNG rng(0);
Mat mContoursImg=mSrc.clone();
for (int a = 0; a < vvContours.size(); ++a)
{
	drawContours(mContoursImg, vvContours, a, Scalar(rng.uniform(0, 255), rng.uniform(0, 255), rng.uniform(0, 255)), 1, LineTypes::LINE_AA);
}
imshow("轮廓", mContoursImg);
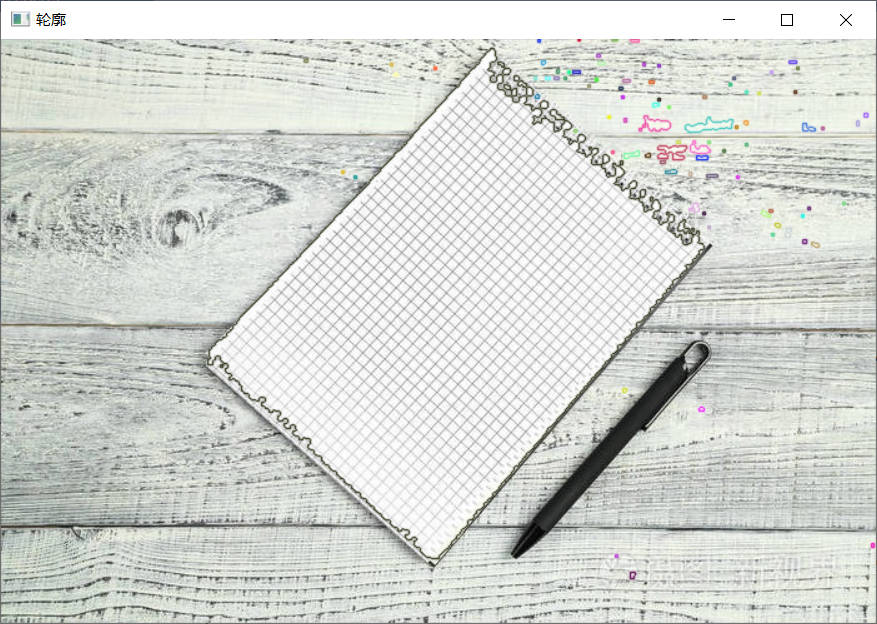
上述代码使用findContours()函数查找出了所有的轮廓并绘制,每个轮廓的颜色随机生成,其中变量vHierarchy并没有使用到,显示结果如下图(图3-3)所示。

点击查看代码
//查找最小外接矩形
vector<RotatedRect> vRotatedRects;
for (int a = 0; a < vvContours.size(); ++a)
{
	vRotatedRects.emplace_back(minAreaRect(vvContours[a]));
}
点击查看代码
//过滤不合格的
vector<RotatedRect> vGoodRotatedRects;
for (int a = 0; a < vRotatedRects.size(); ++a)
{
	Size2f sz_rect = vRotatedRects.at(a).size;
	if (sz_rect.width >= 100 && sz_rect.height>=100)
	{
		vGoodRotatedRects.push_back(vRotatedRects.at(a));
	}
}
点击查看代码
//绘制矩形
Mat mRectsImg = mSrc.clone();
Point2f* p1 = new Point2f[4];
vGoodRotatedRects.front().points(p1);
Scalar color(rng.uniform(0, 255), rng.uniform(0, 255), rng.uniform(0, 255));
for (int a = 0; a < 4; ++a)
{
	line(mRectsImg, p1[a], p1[(a + 1) % 4], color,3);
}
delete p1;
p1 = nullptr;
imshow("最小外接矩形", mRectsImg);

通过图3-4可以明显的看到学生上传的作业本轮廓被提出出来了,与最终预期结果又进一步。
点击查看代码
//绘制十字坐标系、方向
Mat mDirectionImg= mRectsImg.clone();
float fAngle = vGoodRotatedRects.front().angle;
Point2f p2fCenter = vGoodRotatedRects.front().center;
cout << "angle:" << fAngle << ",center:" << p2fCenter << endl;
//x轴
line(mDirectionImg, Point(p2fCenter.x - 200, p2fCenter.y), Point(p2fCenter.x + 200, p2fCenter.y), Scalar(0, 0, 255), 2);
//y轴
line(mDirectionImg, Point(p2fCenter.x, p2fCenter.y-200), Point(p2fCenter.x, p2fCenter.y+200), Scalar(0, 0, 255), 2);
imshow("坐标", mDirectionImg);
angle:41.3478,center:[365.829, 209.149]

具体angle的实际含义可以参考笔者的另一篇文章:https://www.cnblogs.com/hello-nullptr/p/18240905
对于图3-5,若将图像中的作业本校正(使黑色签字笔笔尖垂直向下),则需要将整幅图像逆时针旋转angle度即可,本文通过以下代码实现校正。
点击查看代码
//校正
Mat mRotationKernal= getRotationMatrix2D(p2fCenter, fAngle, 1.0);
Mat mCorrectionImg ;
warpAffine(mSrc, mCorrectionImg, mRotationKernal, mSrc.size());
imshow("校正", mCorrectionImg);

学生提交的作业图片成功被校正了,接下来仅需提取感兴趣区域(ROI)即可。
点击查看代码
//提取ROI区域
Size sz_rect=vGoodRotatedRects.front().size;
Rect rRoi(p2fCenter.x - (sz_rect.width / 2), p2fCenter.y - (sz_rect.height / 2), sz_rect.width, sz_rect.height);
Mat mRoiImg(mCorrectionImg, rRoi);
imshow("ROI", mRoiImg);

至此结束。
4.完整代码
点击查看代码
	//读取图像
	Mat mSrc = imread(path1, ImreadModes::IMREAD_COLOR);
	imshow("源图像", mSrc);

	//高斯模糊
	Mat mGaussian;
	GaussianBlur(mSrc, mGaussian, Size(3, 3), 1);

	//转灰度
	Mat mGray;
	cvtColor(mGaussian, mGray, ColorConversionCodes::COLOR_BGR2GRAY);

	//二值化
	Mat mBin;
	threshold(mGray, mBin, 244, 255, ThresholdTypes::THRESH_TOZERO);

	//膨胀
	Mat mDilateKernal = getStructuringElement(MorphShapes::MORPH_RECT, Size(3, 3));
	dilate(mBin, mBin, mDilateKernal, Point(-1, -1));
	imshow("二值图", mBin);

	//查找轮廓
	vector<vector<Point>> vvContours;
	vector<Vec4i> vHierarchy;
	findContours(mBin, vvContours, vHierarchy, RetrievalModes::RETR_EXTERNAL, ContourApproximationModes::CHAIN_APPROX_SIMPLE);

	//绘制轮廓
	RNG rng(0);
	Mat mContoursImg=mSrc.clone();
	for (int a = 0; a < vvContours.size(); ++a)
	{
		drawContours(mContoursImg, vvContours, a, Scalar(rng.uniform(0, 255), rng.uniform(0, 255), rng.uniform(0, 255)), 1, LineTypes::LINE_AA);
	}
	imshow("轮廓", mContoursImg);

	//查找最小外接矩形
	vector<RotatedRect> vRotatedRects;
	for (int a = 0; a < vvContours.size(); ++a)
	{
		vRotatedRects.emplace_back(minAreaRect(vvContours[a]));
	}

	//过滤不合格的
	vector<RotatedRect> vGoodRotatedRects;
	for (int a = 0; a < vRotatedRects.size(); ++a)
	{
		Size2f sz_rect = vRotatedRects.at(a).size;
		if (sz_rect.width >= 100 && sz_rect.height>=100)
		{
			vGoodRotatedRects.push_back(vRotatedRects.at(a));
		}
	}

	//绘制矩形
	Mat mRectsImg = mSrc.clone();
	Point2f* p1 = new Point2f[4];
	vGoodRotatedRects.front().points(p1);
	Scalar color(rng.uniform(0, 255), rng.uniform(0, 255), rng.uniform(0, 255));
	for (int a = 0; a < 4; ++a)
	{
		line(mRectsImg, p1[a], p1[(a + 1) % 4], color,3);
	}
	delete p1;
	p1 = nullptr;
	imshow("最小外接矩形", mRectsImg);

	//绘制十字坐标系、方向
	Mat mDirectionImg= mRectsImg.clone();
	float fAngle = vGoodRotatedRects.front().angle;
	Point2f p2fCenter = vGoodRotatedRects.front().center;
	cout << "angle:" << fAngle << ",center:" << p2fCenter << endl;
	//x轴
	line(mDirectionImg, Point(p2fCenter.x - 200, p2fCenter.y), Point(p2fCenter.x + 200, p2fCenter.y), Scalar(0, 0, 255), 2);
	//y轴
	line(mDirectionImg, Point(p2fCenter.x, p2fCenter.y-200), Point(p2fCenter.x, p2fCenter.y+200), Scalar(0, 0, 255), 2);
	imshow("坐标", mDirectionImg);

	//校正
	Mat mRotationKernal= getRotationMatrix2D(p2fCenter, fAngle, 1.0);
	Mat mCorrectionImg ;
	warpAffine(mSrc, mCorrectionImg, mRotationKernal, mSrc.size());
	imshow("校正", mCorrectionImg);

	//提取ROI区域
	Size sz_rect=vGoodRotatedRects.front().size;
	Rect rRoi(p2fCenter.x - (sz_rect.width / 2), p2fCenter.y - (sz_rect.height / 2), sz_rect.width, sz_rect.height);
	Mat mRoiImg(mCorrectionImg, rRoi);
	imshow("ROI", mRoiImg);