k8s~istio的安装与核心组件
安装istio
- 在线安装:https://istio.io/latest/docs/setup/getting-started/#download
- 或者直接在这里下载:https://github.com/istio/istio/releases/tag/1.20.2
$ curl -L https://istio.io/downloadIstio | ISTIO_VERSION=1.20.2 TARGET_ARCH=x86_64 sh -
$ cd istio-1.20.2
$ export PATH=$PWD/bin:$PATH

$ istioctl install --set profile=demo -y
✔ Istio core installed
✔ Istiod installed
✔ Egress gateways installed
✔ Ingress gateways installed
✔ Installation complete
卸载
istioctl x uninstall --purge
开启pod自动注入sidecar
$ kubectl label namespace default istio-injection=enabled --overwrite

[root@elasticsearch02 istio]#  kubectl get namespace -L istio-injection
NAME                          STATUS   AGE     ISTIO-INJECTION
apisix                        Active   7d22h
bigdata                       Active   343d
cattle-impersonation-system   Active   674d
cattle-pipeline               Active   356d
cattle-prometheus             Active   568d
cattle-prometheus-p-whn4g     Active   568d
cattle-system                 Active   2y1d
default                       Active   2y1d    enabled
k8s和istio中的组件对比

查看istio的组件
查看pod
kubectl get pods -n istio-system
NAME                                   READY   STATUS    RESTARTS   AGE
istio-egressgateway-67b78cc94c-rm8t5   1/1     Running   0          7m41s
istio-ingressgateway-7d57fd4b-kn8nh    1/1     Running   0          7m41s
istiod-5ddd75f545-kc4lm                1/1     Running   0          8m36s
查看服务
kubectl get svc -n istio-system
NAME                   TYPE           CLUSTER-IP      EXTERNAL-IP   PORT(S)                                                                      AGE
istio-egressgateway    ClusterIP      10.43.208.79    <none>        80/TCP,443/TCP                                                               4d17h
istio-ingressgateway   LoadBalancer   10.43.88.59     <pending>     15021:27218/TCP,80:25359/TCP,443:23532/TCP,31400:13324/TCP,15443:25647/TCP   4d18h
istiod                 ClusterIP      10.43.130.158   <none>        15010/TCP,15012/TCP,443/TCP,15014/TCP
istio-ingressgateway 是 Istio 提供的一个组件,它作为 Kubernetes 集群的入口,接收从集群外部来的流量,并根据 Istio 的路由规则将流量转发到集群内部的服务。
在 Kubernetes 中,istio-ingressgateway 通常被部署为一个 LoadBalancer 类型的 Service。如果你的 Kubernetes 集群运行在支持自动创建负载均衡器的云平台上(如 AWS、GCP、Azure 等),那么当你部署 istio-ingressgateway 时,云平台会自动为它创建一个外部的 L4 层负载均衡器,并将该负载均衡器的 IP 地址或者域名设置到 Service 的 status.loadBalancer.ingress 字段。
然而,如果你的 Kubernetes 集群运行在不支持自动创建负载均衡器的环境中(如裸金属服务器、某些私有云环境等),那么 istio-ingressgateway 的状态就会一直是 Pending,因为 Kubernetes 无法为它创建外部的负载均衡器。这种情况下,你需要手动配置一个方式(如使用 NodePort、HostNetwork 或者使用外部的负载均衡器软件)来让外部流量能够访问到 istio-ingressgateway。
总的来说,istio-ingressgateway 的作用是接收并转发从集群外部来的流量。如果它的状态一直是 Pending,那么可能是因为你的环境不支持自动创建负载均衡器,你需要手动配置一个访问方式。
安装后组件的说明
k8s pod,istio service
在Kubernetes集群中安装 Istio 后,会创建一个名为 istio-system 的命名空间,并在其中部署一些核心的 Istio 组件。这些组件包括:
-
istio-egressgateway:Istio出口网关(Egress Gateway)负责管理服务对外部服务的访问,允许服务在网格之外访问外部服务。它可以配置和执行流量控制、安全策略、路由等功能,以便管理服务对外部服务的通信。
-
istio-ingressgateway:Istio入口网关(Ingress Gateway)用于接收来自外部流量并将其引导到网格内部的服务。它充当了整个服务网格的入口点,可以执行流量路由、负载均衡、TLS终止等功能。
-
istiod:istiod 是 Istio 服务网格的核心组件,负责实现服务发现、流量管理、安全性和遥测等功能。istiod 运行着Pilot、Mixer 和 Citadel 等子组件,它们共同协作来提供服务网格的各种功能。
在Kubernetes中使用 Istio,你可以通过以下方式进行操作:
-
部署微服务应用:将你的微服务应用程序部署到Kubernetes集群中,并且通过Istio的流量管理功能实现服务之间的通信、负载均衡和故障恢复等。
-
配置流量控制:利用Istio的流量管理功能,可以对服务之间的流量进行路由、限速、重试策略等灵活的控制。
-
实现安全策略:通过Istio的安全功能,可以在服务之间实现强大的身份验证、安全通信、访问控制等。
-
收集和展示遥测数据:Istio提供了丰富的遥测功能,可以帮助你收集并展示服务之间的流量、延迟、错误等数据,从而进行监控和故障排查。
总之,在Kubernetes中使用 Istio,你可以利用其丰富的功能来实现微服务架构中的流量管理、安全控制、遥测分析等需求,从而更好地管理和运维你的微服务应用程序。
实例体现
要配置 Istio 的流量管理功能,你需要使用 Istio 的资源对象(如 VirtualService、DestinationRule 等)来定义你的流量控制策略。下面是一些基本的步骤和示例,帮助你开始配置 Istio 的流量管理功能:
demo天气例子
apiVersion: v1
kind: Service
metadata:
  name: frontend
  labels:
    app: frontend
    service: frontend
spec:
  ports:
  - port: 3000
    name: http
  selector:
    app: frontend
---
apiVersion: apps/v1
kind: Deployment
metadata:
  name: frontend-v1
  labels:
    app: frontend
    version: v1 # 注意,这块对应的是istio配置中的DestinationRule里的label,DestinationRule根据v1找到pod中version为v1的pod
spec:
  selector:
    matchLabels:
      app: frontend
      version: v1
  replicas: 1
  template:
    metadata:
      labels:
        app: frontend
        version: v1
    spec:
      containers:
      - name: frontend
        image: istioweather/frontend:v1
        imagePullPolicy: IfNotPresent
        ports:
        - containerPort: 3000
---
apiVersion: v1
kind: Service
metadata:
  name: advertisement
  labels:
    app: advertisement
    service: advertisement
spec:
  ports:
  - port: 3003
    name: http
  selector:
    app: advertisement
---
apiVersion: apps/v1
kind: Deployment
metadata:
  name: advertisement-v1
  labels:
    app: advertisement
    version: v1
spec:
  selector:
    matchLabels:
      app: advertisement
      version: v1
  replicas: 1
  template:
    metadata:
      labels:
        app: advertisement
        version: v1
    spec:
      containers:
      - name: advertisement
        image: istioweather/advertisement:v1
        imagePullPolicy: IfNotPresent
        ports:
        - containerPort: 3003
---
apiVersion: v1
kind: Service
metadata:
  name: forecast
  labels:
    app: forecast
    service: forecast
spec:
  ports:
  - port: 3002
    name: http
  selector:
    app: forecast
---
apiVersion: apps/v1
kind: Deployment
metadata:
  name: forecast-v1
  labels:
    app: forecast
    version: v1
spec:
  selector:
    matchLabels:
      app: forecast
      version: v1
  replicas: 1
  template:
    metadata:
      labels:
        app: forecast
        version: v1
    spec:
      containers:
      - name: forecast
        image: istioweather/forecast:v1
        imagePullPolicy: IfNotPresent
        ports:
        - containerPort: 3002
---
部署istio服务
步骤一:创建Gateway
apiVersion: networking.istio.io/v1alpha3
kind: Gateway
metadata:
  name: weather-gateway
  namespace: istio-system
spec:
  selector:
    istio: ingressgateway # use istio default controller
  servers:
  - port:
      number: 80
      name: http
      protocol: HTTP
    hosts:
    - "*" #对所有域名都生效
步骤一:创建 VirtualService
VirtualService 定义了请求应该如何路由到目标服务。例如,你可以根据请求的路径、主机名等条件将请求路由到不同的服务版本。
apiVersion: networking.istio.io/v1alpha3
kind: VirtualService
metadata:
  name: my-service
spec:
  hosts:
  - "vue.xip.com" #这里配置哪个域名走istio流量控制
  http:
  - route:
    - destination:
        host: frontend
        port:
          number: 8080
        subset: v1
步骤二:创建 DestinationRule
DestinationRule 定义了对特定服务的流量策略,包括负载均衡、TLS设置等。
apiVersion: networking.istio.io/v1alpha3
kind: DestinationRule
metadata:
  name: my-service
spec:
  host: frontend
  subsets:
  - name: v1
    labels:
      version: v1 # 转发到pod中标签有version的,并且值为v1的
  - name: v2
    labels:
      version: v2
查看已经创建的gateway,virtualService
kubectl get gateway -n <namespace>
kubectl describe gateway <gateway-name> -n <namespace>

kubectl get virtualservice -n <namespace>
kubectl describe virtualservice <virtualservice-name> -n <namespace>
查看部署后的gateway和virutalservice
gateway
[root@elasticsearch02 istio]# kubectl describe gateway weather-gateway  -n istio-system
Name:         weather-gateway
Namespace:    istio-system
Labels:       <none>
Annotations:  kubectl.kubernetes.io/last-applied-configuration:
                {"apiVersion":"networking.istio.io/v1alpha3","kind":"Gateway","metadata":{"annotations":{},"name":"weather-gateway","namespace":"istio-sys...
API Version:  networking.istio.io/v1beta1
Kind:         Gateway
Metadata:
  Creation Timestamp:  2024-01-24T03:08:34Z
  Generation:          4
  Managed Fields:
    API Version:  networking.istio.io/v1alpha3
    Fields Type:  FieldsV1
    fieldsV1:
      f:metadata:
        f:annotations:
          .:
          f:kubectl.kubernetes.io/last-applied-configuration:
      f:spec:
        .:
        f:selector:
          .:
          f:istio:
        f:servers:
    Manager:         kubectl
    Operation:       Update
    Time:            2024-01-24T03:08:34Z
  Resource Version:  190297478
  UID:               4e92bf14-dda0-468a-8c9f-00b3297b121e
Spec:
  Selector:
    Istio:  ingressgateway
  Servers:
    Hosts:
      *
    Port:
      Name:      http
      Number:    80
      Protocol:  HTTP
Events:          <none>
virtualservice
[root@elasticsearch02 istio]# kubectl describe virtualservice frontend-route -n ic-test
Name:         frontend-route
Namespace:    ic-test
Labels:       <none>
Annotations:  kubectl.kubernetes.io/last-applied-configuration:
                {"apiVersion":"networking.istio.io/v1alpha3","kind":"VirtualService","metadata":{"annotations":{},"name":"frontend-route","namespace":"ic-...
API Version:  networking.istio.io/v1beta1
Kind:         VirtualService
Metadata:
  Creation Timestamp:  2024-01-24T03:08:55Z
  Generation:          6
  Managed Fields:
    API Version:  networking.istio.io/v1alpha3
    Fields Type:  FieldsV1
    fieldsV1:
      f:metadata:
        f:annotations:
          .:
          f:kubectl.kubernetes.io/last-applied-configuration:
      f:spec:
        .:
        f:gateways:
        f:hosts:
        f:http:
    Manager:         kubectl
    Operation:       Update
    Time:            2024-01-24T03:08:55Z
  Resource Version:  190328684
  UID:               94c655d1-c48a-45b6-8f90-e0bf214702eb
Spec:
  Gateways:
    istio-system/weather-gateway
  Hosts:
    vue.xip.com
  Http:
    Match:
      Port:  80
    Route:
      Destination:
        Host:  frontend
        Port:
          Number:  3000
        Subset:    v1
Events:            <none>
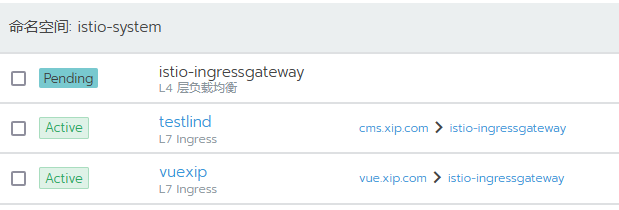
在ingress中可视化体现,多个域名都通过istio ingress去管理入口流量

自动sidecar注入配置
要在 Istio 中开启自动的 sidecar 注入,你可以通过以下步骤来实现:
-
安装 Istio:首先需要安装 Istio 到你的 Kubernetes 集群中。你可以使用 istioctl 或者 Helm 来进行安装,具体安装步骤可以参考 Istio 官方文档。
-
开启自动 sidecar 注入:在安装 Istio 时,你可以选择开启自动 sidecar 注入功能。在 Istio 1.5 版本后,默认情况下自动 sidecar 注入功能是开启的,但在一些特定情况下可能需要手动确认是否已经开启。
-
确认命名空间标签:确保你要启用自动 sidecar 注入的命名空间已经添加了 Istio 的注入标签。你可以通过以下命令来查看:
kubectl get namespace your-namespace -o=jsonpath='{.metadata.labels}'如果没有 istio-injection 标签,你可以使用以下命令来为命名空间添加标签:
kubectl label namespace your-namespace istio-injection=enabled -
部署新的 Pod:一旦确认自动 sidecar 注入功能已经开启,并且命名空间已经添加了 Istio 的注入标签,当你部署新的 Pod 时,Istio 将会自动为其注入 sidecar 容器。
通过以上步骤,你应该能够成功地开启 Istio 中的自动 sidecar 注入功能,并确保所有的服务都能够通过 Envoy 代理进行流量管理和控制。
istio中的对象汇总
在 Istio 中,ServiceEntry、DestinationRule 和 VirtualService 是用来定义和配置流量管理的重要概念。下面简要介绍它们的作用:
-
ServiceEntry:
- 作用:ServiceEntry 允许你将外部服务引入到 Istio 网格中,或者定义对外部服务的访问策略。
- 场景:当你需要让 Istio 管理对外部服务的访问时,可以使用 ServiceEntry 将外部服务引入到 Istio 网格中,并对其进行流量控制和安全策略的定义。
-
DestinationRule:
- 作用:DestinationRule 定义了对特定服务的流量策略,包括负载均衡、TLS设置等。
- 场景:在 Istio 中,你可以使用 DestinationRule 来定义对服务的流量策略,比如指定不同版本的服务之间的流量比例、超时设置、负载均衡策略等。
-
VirtualService:
- 作用:VirtualService 定义了请求应该如何路由到目标服务,以及对请求的修改和转发。
- 场景:通过 VirtualService,你可以定义基于请求的流量路由规则,比如根据请求的路径、主机名等条件将请求路由到不同的服务版本,还可以定义请求的修改和转发。
这些概念一起构成了 Istio 中强大的流量管理功能,使得你能够灵活地定义和控制服务之间的通信和流量行为。通过合理使用这些概念,你可以实现诸如流量控制、故障恢复、A/B 测试、蓝绿部署等高级的流量管理策略。
除了 ServiceEntry、DestinationRule 和 VirtualService,Istio 还有一些其他重要的对象和资源,用于定义和配置服务网格中的各种功能和策略。以下是一些常见的 Istio 对象:
-
Gateway:用于定义 Istio 网格的入口点,允许流量进入网格并将其路由到适当的服务。
-
Sidecar:在 Istio 中,每个部署的应用程序都会有一个称为 sidecar 的边车代理,它负责处理应用程序的所有网络通信,并与 Istio 控制平面进行交互。
-
AuthorizationPolicy:用于定义对服务之间流量的访问控制策略,包括认证、授权和安全策略等。
-
PeerAuthentication:用于定义服务之间的双向 TLS 认证策略,确保服务之间的通信是安全的。
-
RequestAuthentication:用于定义对服务端点的请求认证策略,可以限制来自客户端的请求必须满足特定的认证条件。
-
EnvoyFilter:允许你为 Envoy 代理定义自定义的过滤器和配置,以实现更灵活的流量控制和处理。
-
ServiceRole 和 ServiceRoleBinding:用于定义对服务的角色和权限控制,可以限制哪些服务具有对其他服务的访问权限。
这些对象一起构成了 Istio 的配置模型,通过对这些对象的定义和配置,你可以实现对服务网格中流量管理、安全性、可观察性等方面的精细控制。因此,熟悉并理解这些对象是使用 Istio 进行微服务架构管理的关键。
在istio中,Gateway,DestinationRule和VirtualService三者之间的关系可以用以下文字图示表示:
         +-------------------+
         |      Gateway      |
         +---------+---------+
                   |
                   v
         +---------+---------+
         |  VirtualService  |
         +---------+---------+
                   |
                   v
         +---------+---------+
         |  DestinationRule |
         +-------------------+
在这个示意图中,Gateway负责接收外部流量,并将其转发到内部服务。VirtualService定义了流量的路由规则,指定了如何将接收到的流量发送到不同的目标服务或版本。而DestinationRule定义了服务之间的通信策略,包括负载均衡、故障恢复等。因此,这三者之间存在一定的依赖关系,Gateway接收流量并将其传递给VirtualService,而VirtualService再根据定义的规则将流量分发给后端服务,同时DestinationRule定义了这些后端服务之间的通信策略。
Envoy Sidecar模式
当你将Istio部署到Kubernetes集群中时,它在外部流量转发的过程中起到了以下作用:
-
流量管理:Istio通过Envoy sidecar代理来管理流量,可以实现流量控制、负载均衡、故障恢复和A/B测试等功能。
-
安全:Istio提供了服务间的认证、加密通信和访问控制,确保了服务之间的安全通信。
-
监控:Istio收集并展示了整个服务网格的指标、日志和跟踪数据,帮助你更好地监控和调试服务。
-
策略执行:Istio可以通过定义网络策略来限制流量,例如路由规则、重试策略、超时设置等。
下面是一个简单的图示,描述了在Kubernetes集群中使用Istio的流量管理过程:
外部流量 -> Ingress -> Istio Ingress Gateway -> Envoy Sidecar -> 后端服务
在这个示意图中,外部流量首先经过Kubernetes的Ingress,然后被Istio Ingress Gateway接管,并通过Envoy sidecar代理进行流量管理,最终到达后端服务。
