Redis基础知识(学习笔记18--主从集群)
一.主从相关的配置
1.1 masterauth
# If the master is password protected (using the "requirepass" configuration
# directive below) it is possible to tell the replica to authenticate before
# starting the replication synchronization process, otherwise the master will
# refuse the replica request.
#
# masterauth <master-password>
#
因为我们要搭建主从集群,且每个主机都有可能会是Master,如果设置验证属性requirepass。一定要每个主机的密码都设置为相同的。此时每个配置文件中都要设置两个完全相同的属性:requirepass与masterauth。其中requirepass用户指定当前主机的访问密码,而masterauth用于指定当前slave访问master时向master提交的访问密码,用于让master验证请求者身份是否合法。
1.2 repl-disable-tcp-nodelay
# Disable TCP_NODELAY on the replica socket after SYNC?
#
# If you select "yes" Redis will use a smaller number of TCP packets and
# less bandwidth to send data to replicas. But this can add a delay for
# the data to appear on the replica side, up to 40 milliseconds with
# Linux kernels using a default configuration.
#
# If you select "no" the delay for data to appear on the replica side will
# be reduced but more bandwidth will be used for replication.
#
# By default we optimize for low latency, but in very high traffic conditions
# or when the master and replicas are many hops away, turning this to "yes" may
# be a good idea.
repl-disable-tcp-nodelay no
该属性用于设置是否禁用TCP特性tcp-nodelay。设置为yes则禁用tcp-nodelay,此时master与slave间的通信会产生延迟,但使用的TCP包数量较少,占用的网络带宽会较小。相反,如果设置为no,则网络延迟会变小,但使用的TCP包数量会较多,相应占用的网络带宽会变大。
知识点补充---tcp-nodelay
为了充分复用网络带宽,TCP总是希望发送尽可能大的数据块。为了达到该目的,TCP中使用了一个名为Nagle的算法。
Nagle算法的原理是,网络在接收到要发送的数据后,并不直接发送,而是等待着数据量足够大(由TCP网络特性决定)时再一次性发送出去。这样,网络上传输的有效数据的比例就等到了大大提升,无效数据的传输极大减少,于是就节省了网络带宽,缓解了网络压力。
tcp-nodelay 则是TCP协议中Nagle算法的开关。
1.3 pidfile
# If a pid file is specified, Redis writes it where specified at startup
# and removes it at exit.
#
# When the server runs non daemonized, no pid file is created if none is
# specified in the configuration. When the server is daemonized, the pid file
# is used even if not specified, defaulting to "/var/run/redis.pid".
#
# Creating a pid file is best effort: if Redis is not able to create it
# nothing bad happens, the server will start and run normally.
#
# Note that on modern Linux systems "/run/redis.pid" is more conforming
# and should be used instead.
pidfile /var/run/redis_6379.pid
如果是多实例安装(一台机器上安装多个redis实例),记得要修改这个参数。
当然,另外一些参数配置
端口号(port)、dbfilename、appendfilename、logfile、replica-priority
简单说下 replica-priority
# The replica priority is an integer number published by Redis in the INFO
# output. It is used by Redis Sentinel in order to select a replica to promote【提升;晋升;】
# into a master if the master is no longer working correctly.
#
# A replica with a low priority number is considered better for promotion, so  ##越小优先级越高
# for instance if there are three replicas with priority 10, 100, 25 Sentinel
# will pick the one with priority 10, that is the lowest.
#
# However a special priority of 0 marks the replica as not able to perform the ##特殊的优先级的值为0
# role of master, so a replica with priority of 0 will never be selected by    ##0丧失了称为master的可能性
# Redis Sentinel for promotion.
#
# By default the priority is 100.
replica-priority 100
1.4 个性化的配置依赖参数include
################################## INCLUDES ###################################

# Include one or more other config files here.  This is useful if you
# have a standard template that goes to all Redis servers but also need
# to customize a few per-server settings.  Include files can include
# other files, so use this wisely.
#
# Note that option "include" won't be rewritten by command "CONFIG REWRITE"
# from admin or Redis Sentinel. Since Redis always uses the last processed
# line as value of a configuration directive, you'd better put includes
# at the beginning of this file to avoid overwriting config change at runtime.
#
# If instead you are interested in using includes to override configuration
# options, it is better to use include as the last line.
#
# Included paths may contain wildcards. All files matching the wildcards will
# be included in alphabetical order.
# Note that if an include path contains a wildcards but no files match it when
# the server is started, the include statement will be ignored and no error will
# be emitted.  It is safe, therefore, to include wildcard files from empty
# directories.
#
# include /path/to/local.conf
# include /path/to/other.conf
# include /path/to/fragments/*.conf
#

################################## MODULES #####################################
例如我们想独立出一个配置文件,但是呢,只想修改几个或者少部分参数项,这时候,可以include进基本的配置文件,只把需要修改的参数,重写下即可。
二. 设置主从关系
2.1 查看
先查看下主从关系,查看指令
> info replication
在主节点上执行,
返回值 role 代表当前节点的角色;
connected_slaves的数值代表 从节点 的个数;
如果有slave节点的话,会以slave0、slave1 呈现出具体的slave信息(ip:port:state:offset:lag)。
而在从节点上执行的话,返回值是不一样的:
返回值role 代表集群角色,其他的返回值还有master_ip、master_port、master_link_status、master_last_io_seconds_age、master_sync_in_process、slave_read_only等等。
需要注意的是从节点是不可以执行写命令的,否则报错
(error)READONLY You can't write against a read only replica.
2.2 设置命令
在从节点上执行命令,如下
> slaveof host(主节点ip) port(主节点的端口号)
只执行上面的命令,如果从节点重启的话,主从关系就会失效,即丢失已设置的主从关系。
2.3. 分级管理
若redis主从集群中的slave较多时,他们的数据同步过程会对master形成较大的性能压力。此时,可以对这些slave进行分级管理。
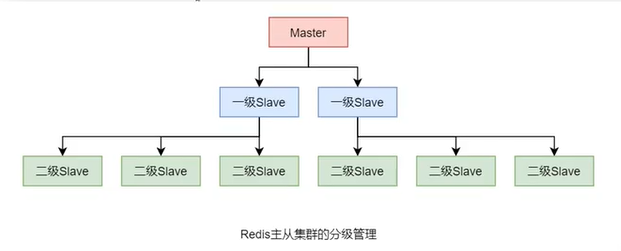
设置方式很简单,只需要让低级别slave指定其slaveof的主机为上一级slave即可。不过,上一级slave的状态仍为slave,只不过,其是更上一级的slave。
调整主从关系,不需要关闭已有关系,再重建,而是直接执行 slaveof host port 进行调整即可。
2.4 容灾冷处理
在master/slave的redis集群中,若master出现了宕机怎么办?有两种处理方式,一种是通过手工角色调整,使slave晋升为master的冷处理;一种是使用哨兵模式,实现redis集群的高可用HA,即热处理。
无论master是否宕机,slave都可以通过下面的命令,将自己提升为master。
> slaveof no one
如果其原本就有下一级的slave,那么,其就直接变为了这些slave的真正的master了。而原来的master就会失去了这个原来的slave。
三. 主从复制原理
3.1 主从复制过程
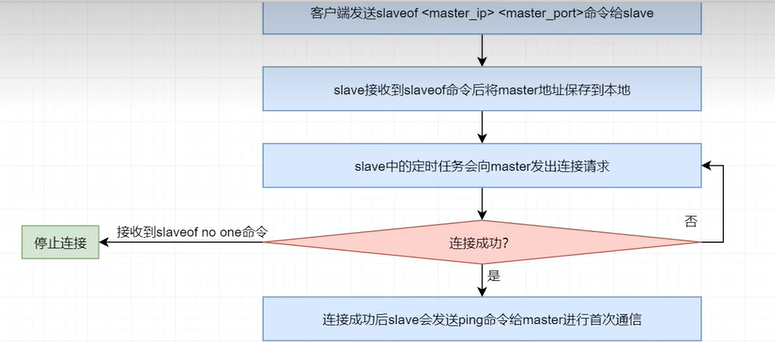
当一个redis节点(slave)接收到类似slaveof 127.0..1 6379 的指令后直至其可以从master持续复制数据,大体经历了如下几个过程:
(1)保存master地址
当slave接收到slaveof <master_ip> <master_port>指令后,slave会立即将新的master的地址保存下来。
(2)建立连接
slave中维护着一个定时任务,该定时任务会尝试着与该master建立socker连接。
(3)slave发送ping命令
连接成功后,slave会发送ping命令,进行首次通信。如果slave没有收到master的回复,则slave就会主动断开连接,下次的定时任务会重新尝试连接。
(4)对slave身份验证
master 在接收到slave的ping命令后,并不会立即对其进行回复,而是先对Salve进行身份验证。如果验证不通过,则会发送消息拒绝连接;。验证通过,master 向slave发送连接成功响应。
(5)master持久化
slave在成功接收到master的响应后,slave向master发出数据同步请求。master在接收到数据同步请求后,fork出一个子进程,让子进程以异步方式立即进行数据持久化。
(6)数据发送
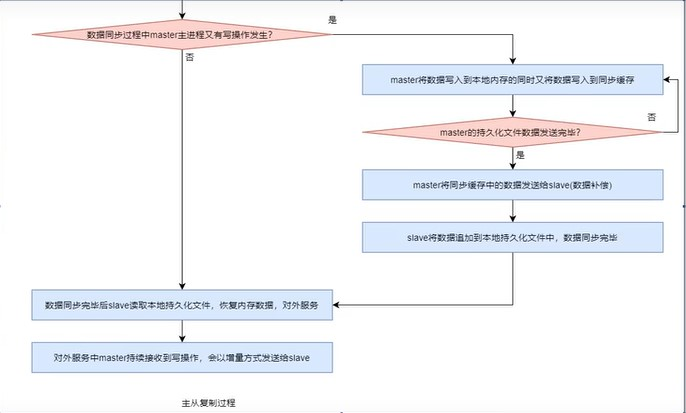
持久化完毕后,master再fork出一个子进程,让子进程以异步方式将数据发送给slave。slave会将接收到的数据不断写入到本地的持久化文件中。
在slave数据同步过程中,master的主进程仍在不断地接受着客户端的写操作,且不仅将新的数据写入到master内存,同时也写入到了同步缓存。当master的持久化文件中的数据发送完毕后,master会再将同步缓存中新的数据发送给slave,由slave将其写入到本地持久化文件中。数据同步完成。
(7)slave恢复内存数据
数据同步完毕后,slave就会读取本地持久化文件,将其恢复到本地内存数据,然后就可以对外提供服务了。
(8)持续增量复制
对外服务中master持续接收到写操作,会以增量方式发送给slave,以保证主从数据的一致性。
流程概况如下


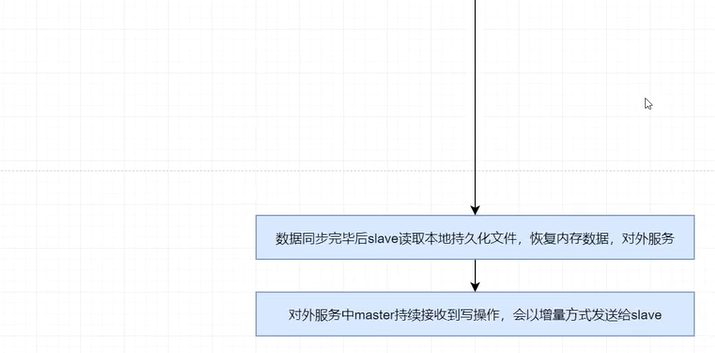
考虑到数据发送过程中,仍由数据进来,补充如下:
3.2 数据同步演变过程
(1)sync 同步
redis 2.8 版本之前,首次通信成功后,slave会向master发送sync数据同步请求,然后master就会将其所有数据全部发送给slave,由slave保存到其本地的持久化文件中。这个过程称为全量复制。
但这里存在一个问题:在全量复制过程中可能会出现网络抖动而导致复制过程中断。当网络恢复后,slave与master重新连接成功,此时slave会重新发送sync请求,然后会从头开始全量复制。
由于全量复制过程非常耗时,所以期间出现网络抖动的概率很高。而中断后的从头开始不仅需要消耗大量的系统资源、网络带宽,而且可能会出现长时间无法完成全量复制的情况。
(2)psync
redis 2.8 版本之后,全量复制采用了psync(Partial Sync,不完全同步)同步策略。当全量复制过程出现由于网络抖动而导致复制过程中断时,当重新连接成功后,复制过程可以“断点续传”。即从断点位置开始继续复制,而不用从头再来。这样大大提升了性能。
为了实现psync,整个系统做了三个大的变化:
A. 复制偏移量
系统为每个需要传送数据进行了编号,该编号从0开始,每个字节一个编号。该编号称为复制偏移量。参与复制的主从节点都会维护该复制偏移量。
可以通过 命令info replication 的返回结果中的 slave_repl_offset (从节点)或 master_repl_offset(主节点 代表已发送出去的数据)值查看。
B.主节点复制ID
当master启动后,就会动态生成一个长度为40位的16进制字符串作为当前master的复制ID,该ID是在进行数据同步时slave识别master使用的。通过 info replication 的master_replid属性可查看到该ID。
特别注意:master redis 重启,动态生成的复制ID就会变化。
C.复制积压缓冲区
当master有连接的slave时,在master中就会创建并维护一个队列backlog,默认大小为1MB,该队列称为复制积压缓冲区。master接收到了写操作,数据不仅会写入到了master主存,写入到了master中为每个slave配置的发送缓存,而且还会写入到复制积压缓冲区。其作用就是用于保存最近操作的数据,以备“断点续传”时做数据补偿,防止数据丢失。
D. psync 同步过程
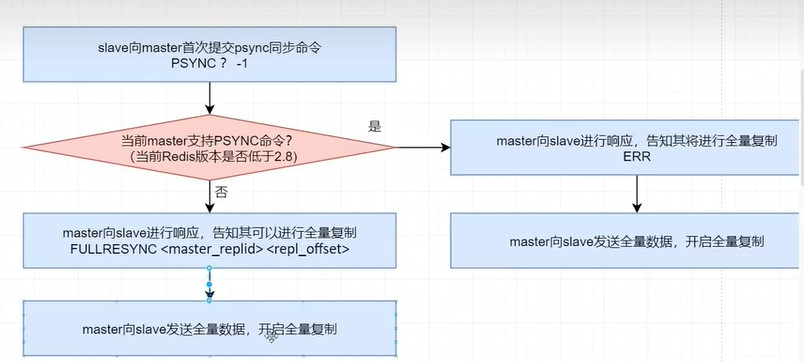
psync是一个由slave提交的命令,其格式为psync <master_replid> <repl_offset> ,表示当前slave要从指定中的repl_offset+1处开始复制。 repl_offset表示当前slave已经完成复制的数据的offset。该命令保证了“断点续传”的实现。
在第一次开始复制时,slave并不直到master的动态ID,并且一定时从头开始复制,所以其提交的psync命令为PSYNC ? -1。即master_replid 为问号(?),repl_offset为-1。
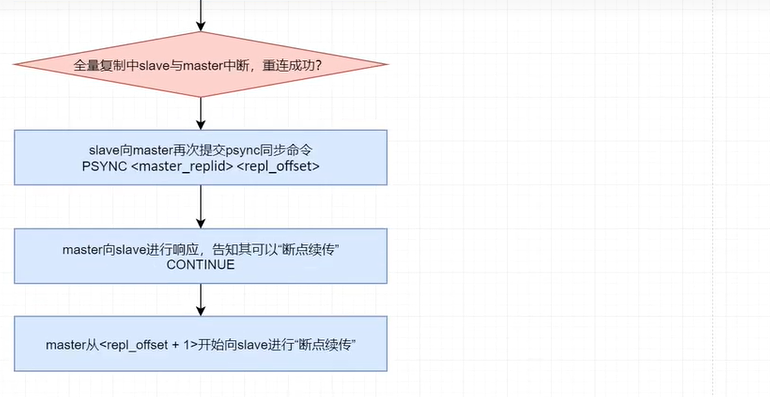
如果复制过程中断后,slave与master成功连接,则save再次提交psync命令。此时psync命令的repl_offset参数为其前面已经完成复制的数据的偏移量。
其实,并不是slave提交psync命令后就可以立即从master处开始复制,而是需要master给出响应结果后,根据响应结果来执行。master根据slave提交的请求及master自身情况会给出不同的响应结果。响应结果有三种可能:
- FULLRESYNC <master_replid> <repl_offset>:告知slave当前master的动态ID及可以开始全量复制了,这里的repl_offset一般为0。
- CONTINUE:告知slave可以按照你提交的repl_offset后面位置开始“续传”了。
- ERR:告知slave,当前master的版本低于redis 2.8 ,不支持psync,你可以开始全量复制。
psync过程概况如下
E. psync存在的问题
- 在psync数据同步过程中,若slave重启,在slave内存中保存的master的动态ID与续传需要的offset都会消失,“断点续传”将无法进行,从而只能进行全量复制,导致资源浪费。
- 在psync数据同步过程中,master宕机后slave会发生“易主”,从而导致slave需要从新master进行全量复制,形成资源浪费。
(3)psync 同步的改进
Redis 4.0 对psync进行了改进,提出了“同源增量同步”策略。
A. 解决slave重启问题
针对“slave重启时master动态ID丢失问题”,改进后的psync将master的动态ID直接写入到了slave的持久化文件中。
slave重启后直接从本地持久化文件中读取master的动态ID,然后向master提交获取复制偏移量的请求。master会根据提交请求的slave地址,查找到保存在master中的复制偏移量,然后向slave回复FULLRESYNC <master_replid> <repl_offset>,以告知slave其马上要开始发送的位置。然后master开始“断点续传”。
B. 解决slave易主问题
slave易主后需要和新master进行全量复制,本质原因是新master不认识slave提交的psync请求中的“原master的动态ID”。如果slave发送psync <原master_replid> <repl_offset> 命令,新的master能够识别出该slave要从原master复制数据,而自己的数据都是从该master复制来的。那么新master就会明白,其与该slave"师出同门",应该接收其“断点续传”同步请求。
而新master中恰好保存的有“原master的动态ID”。由于改进后的psync中每个slave都在本地保存了当前的master的动态ID,所以当slave晋升为新的master后,其本地仍保存有之前master的动态ID。而这一点也恰恰为解决“slave易主”问题提供了条件。通过master的info replication 中master_replid2 可以查看到。如果尚未发送易主,则该值为40个0。
(4) 无盘操作
Redis 6.0 对同步过程又进行了改进,提出了“无盘全量同步”与“无盘加载”策略,避免了耗时的IO操作。
- 无盘全量同步:master的主进程fork出的子进程直接将内存中的数据发送给slave,无需经过磁盘。
- 无盘加载:slave在接收到master发送来的数据后不需要将其写入到磁盘文件,而是直接写入到内存,这样slave就可快速完成数据恢复。
(5) 共享复制积压缓冲区
Redis 7.0 版本对复制积压缓冲区进行了改进,让各个slave的发送缓冲区共享复制积压缓冲区。这使得复制积压缓冲区的作用,除了可以保障数据的安全性外,还作为所有slave的发送缓冲区,充分利用了复制积压缓冲区。
学习参阅特别声明
【Redis视频从入门到高级】
【https://www.bilibili.com/video/BV1U24y1y7jF?p=11&vd_source=0e347fbc6c2b049143afaa5a15abfc1c】